S3 static website hosting is a very good feature for hosting an application to the internet. It is more cost effective method than hosting applications on EC2 instances. Setting up an application on S3 bucket is simple and easiest way. Now we are going to cover this demo for “host a simple ReactJs application on a S3 bucket Static Website hosting with automated deployments using AWS CodePipeline ”. In this article we are going to use a Terraform Script to create Code Pipeline and some other AWS services that we need for this session.
Automate ReactJS Application Deployments using Terraform
Before we move into a demo, let’s understand some of the features that we are going to use in this article.
S3 Bucket Static Website Hosting
S3 Bucket is an object storing service. It’s a simple and reliable service. Using this feature, you can host a website from your S3 bucket. Very low cost for storing and transferring the data of your website. Enabling static website hosting on S3 Bucket is helps to host any content in the S3 bucket to Internet.
Code Build
Code Build is a service that comes under continuous integration provided by AWS. It is a fully managed service that is provided by AWS. It helps to compile the source code, run a test and produce the code to artifacts that are ready for the deployment process. This service is automatically triggered by a code pipeline.
Code Deploy
Code Deploy is a continuous deployment service offered by AWS. It uses the artifact that builds from code build, and deploy it to the S3 bucket or any other AWS services.
Code Pipeline
AWS CodePipeline is a CI-CD tool. CI and CD stand for continuous integration and continuous delivery/continuous deployment. CodePipeline is an end-to-end Automation tool. This pipeline fetches the code from our GitHub repository, Build the code using Code Build and Deploy the code to S3 bucket using Code Deploy. It is a fully automated solution, once the code is pushed to the repository, CodePipeline knows the changes and triggers the pipeline and it takes the rest of the steps.
Prerequisites
- Verify you have installed Terraform on your machine. If not click this link to download it https://www.terraform.io/downloads
- Terraform version: 1.6.5 or above
- An IAM user with the necessary permissions
- Nodejs – version: 20
Procedure
Create Build spec file for ReactJs App
- First, we are going to push code for the ReactJs application to our GitHub Repository.
- I have provided the code for the ReactJs app on the link below.
https://github.com/easydeploy-cloud/reactjs-app-for-s3-static-webhosting
- You can directly clone it from that link. And you have to create a new repository on your GitHub account.
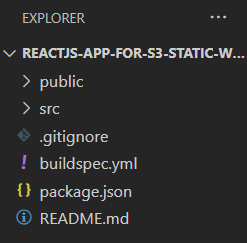
- Look at the above image it shows a list of the files and folders that you have downloaded from the above link.
- Now push the all files that you downloaded from the above link to your GitHub repository which you are newly created.
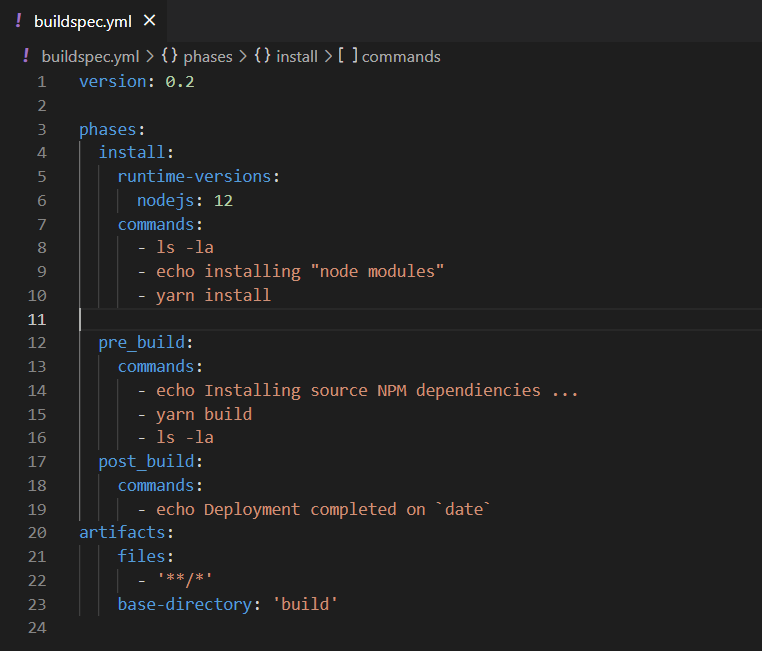
- The above picture has the contents of the buildspec.yml file.
- This file is used by Code Build for building our ReactJs app to deploy it in the S3 bucket.
- This file will build our application code into an artifact using yarn.
- Yarn is nothing but a package manager just like npm. Yarn stands for Yet Another Resource Negotiator. The intention for deploying yarn was to fix performance and security concerns with npm.
Get Terraform code from the Remote repository
Using the below link to clone the code from the GitHub repository to your local machine.
https://github.com/easydeploy-cloud/s3-bucket-static-webhosting-with-codepipeline-terraform
This terraform code helps us to create an S3 bucket for Static website hosting and create a code pipeline for the CI-CD process.
Create Code Star Connection to GitHub
Once you clone the Terraform code to your local machine, open the code. Go to the folder named codestar. This code will create a connection to GitHub. First, we need to setup this because only our CodePipeline will fetch the code of the reactJs app from the repository.
- Run terraform init command to initialize the dependencies that terraform needs.
- Then run terraform plan command to see what are resources going to be created.

You can see this code will going to create a connection to GitHub
- So, now run the terraform apply the command to deploy the code to AWS.
Once the code is applied successfully, go to your AWS account, search for CodePipeline, and click it.

- It navigates you to the CodePipeline page. Here click the settings and then connections.
- You can see there is a connection that will be created but is in a pending status. Because we need to authorize the AWS account to access the GitHub account.
- So, click the name pipeline automation that will be under the column connection name.


- Here you saw the pending connection state. Click the Update pending connection button it opens a page GitHub Connection settings, select your GitHub account to access.
- If you can’t see your account, click Install a new app button to connect your GitHub account.
- Once you finish the connection you can see the status of the connection is Active.

- Note the Arn that is present in the right side of the page as mentioned in the above image. This is the one we are going to use in our next code.
Create CodePipeline with S3 bucket for Static Web Hosting
- Go to your VS Code editor and open the terminal.
- Run the command “cd ../” to navigate to the previous folder.
- Then run init command to initialize the dependency packages for Terraform
- Open variables.tf file. Here we are specified some of the variables that we use in the code.
- For pipeline_bucket_name, provide a unique name for the S3 bucket that stores the artefacts of the CodePipeline.
- For app_bucket_name, provide a unique name for the S3 bucket that hosts a static website of your ReactJs app.
- For projectname, provide a name that identifies these resources from all of the other services in your AWS Account.
- So, repo_id and repo_branch_name, provide the id of your repository that you have your Reactjs code and enter a branch name.
- And for the connection_arn, provide the Arn that you note from the previous step.
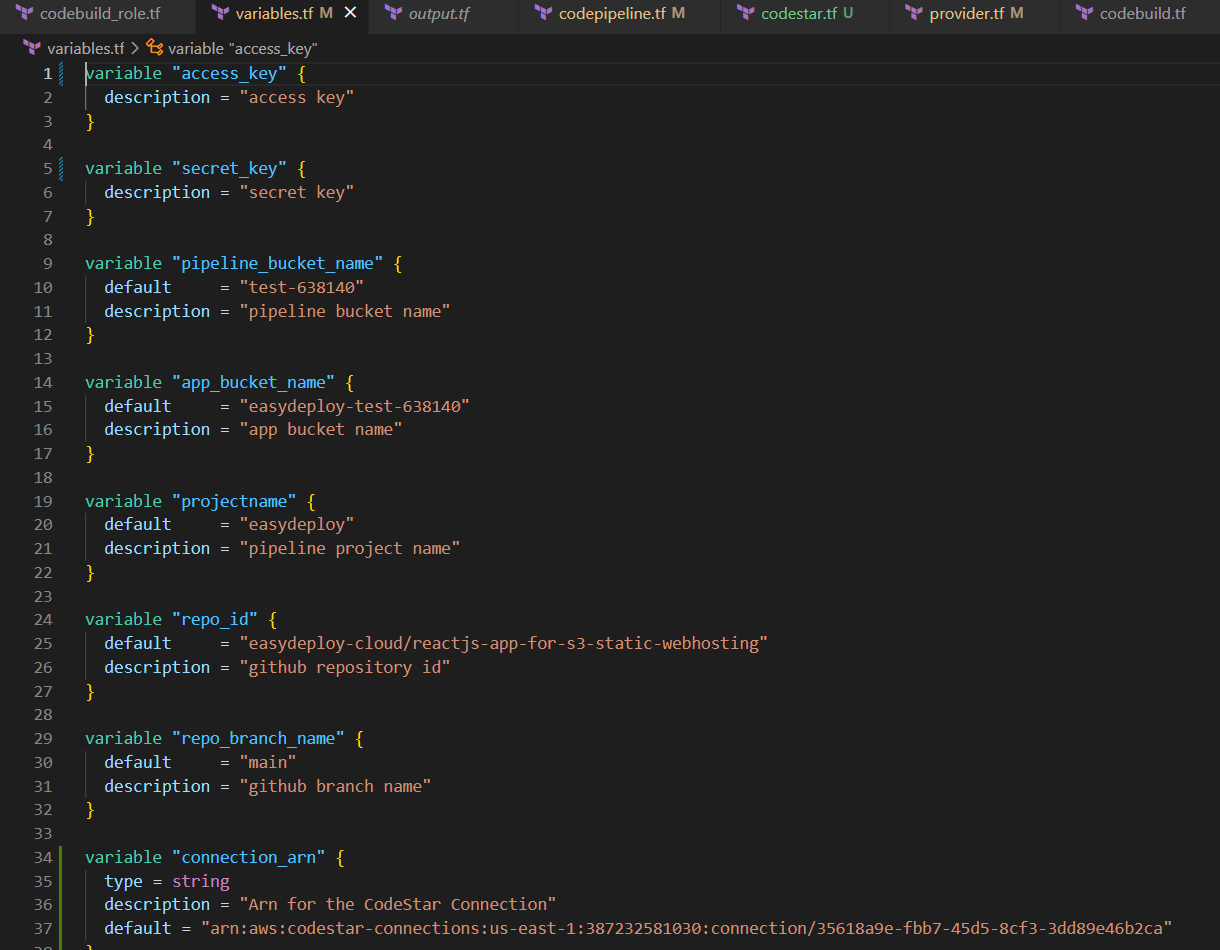
- Once all the variables setup is finished, run terraform apply command. For this purpose, I am straightly running the apply command. But the best practice is first to run the plan command to know what is going to happen, then only run apply.
- So, when you run the apply command it asks some values for access_key and secret_key. You can provide it here.

- Pls verify whether this code is delete anything or change anything. For here it is not going to delete or modify anything. It is just ‘10 to add 0 to change and 0 to destroy. Enter yes to proceed.
- If the application is completed, Go to your AWS account and go to the CodePipeline page and select the pipeline.
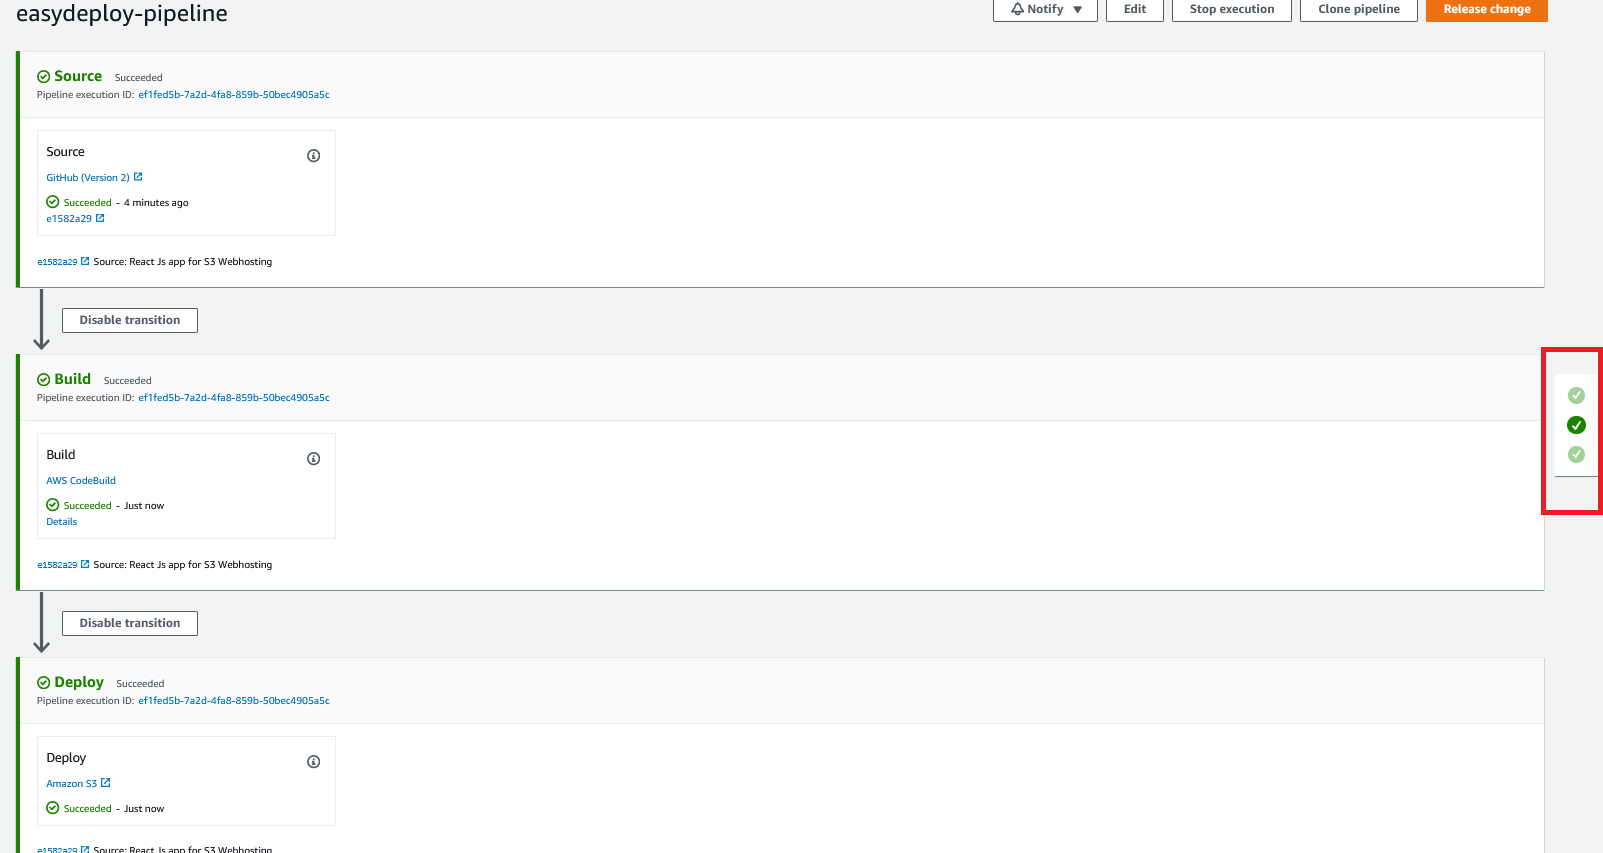
- Wait until it completes all the processes from Source to Deploy.
- All three steps should be completed successfully.
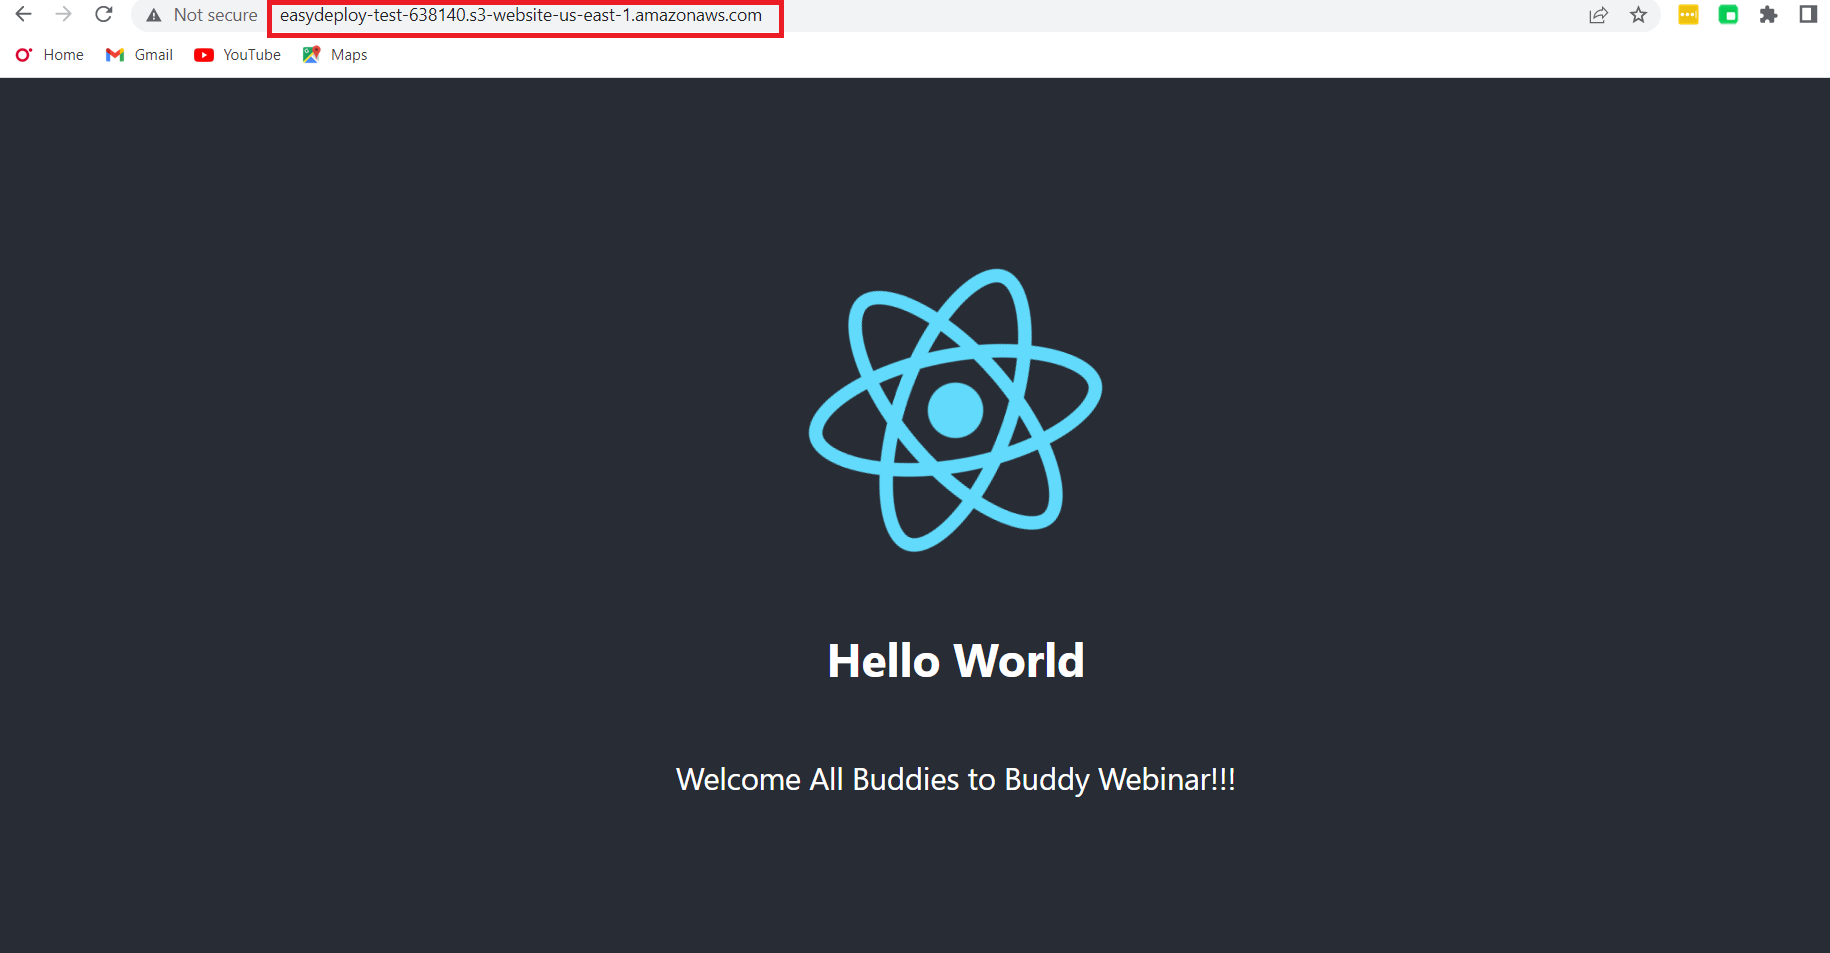
- Once successful, navigate to the terminal and you can see static_website_endpoint. This is the endpoint of the S3 bucket’s website hosting.

- Copy the value and paste it into the browser. If the application is perfectly deployed, It looks like the below image.
- Additionally, you can point this endpoint to your Domain using Route53.
- In the Route53 section create a hosted zone for your domain name.
- Then create an “A” type record, add a subdomain and route the traffic to your AWS S3 bucket which is hosted by your ReactJs app.
- But you must have to note one thing. If you need to route traffic from an S3 bucket static website hosting to a domain, you must provide the S3 bucket name the same as the custom domain name.
Yeah! You have successfully created a Terraform script to deploy a ReactJs app in an S3 Bucket static website hosting with an automation process using CodePipeline.




Hi, I tried to follow the same steps, it created the code star connection but when I run tf apply from main folder I see the following error:
│ Error: putting S3 policy: AccessDenied: Access Denied
│ status code: 403, request id: KX9926TG0XP3XWEV, host id: gAu/v5UBwTfEobrZs3bO1Va5GeqZGgWCZnj15w2f/UlerssRceRhThpc3oyVs1fuuteIAJ/8DO4=
│
│ with aws_s3_bucket_policy.app_bucket_policy,
│ on app_s3.tf line 18, in resource “aws_s3_bucket_policy” “app_bucket_policy”:
│ 18: resource “aws_s3_bucket_policy” “app_bucket_policy” {
Hi Shyam,
There was a some bug in our old code with the new Terraform version.
I have updated the Terraform code to eliminate this error. Now you can clone the code from the mentioned repository and You can use it.
Thank you…
If you have any queries, feel free to ask me.
Hi there i still have the same problem like Shyam, can u look it up again if it needs another updates.
Thanks
Hi Filan,
Can you try again with the latest version of Terraform like Terraform v1.6.5 and above?
I haven’t found any error while I executing the script.
If you still have the issue wait for a day. I will create a video for this blog, that will have the latest version of this terraform code.
Thank you